Blog

Kitchen Design Plugin for Sketchup, Sketchup training.

Destroyed in Seconds

I am not a destructive person by nature... But the other day I was getting frustrated because I just couldn't get this design I was working on right. I was about to get up from the computer and go do something different when I thought of something that would be a great stress reliever: Destroy my new design right in the computer!

In Sketchup, there is this wonderful physics simulator plugin called "SketchyPhysics". It's now in its third iteration.

SketchyPhysics is based on a video game physics engine. It can simulate a lot of real world variables like gravity, magnetism, buoyancy, and others. It allows you to make things called "Motors" and "Servo's". I'll let YouTube do some talking here. The following is the video I made after installing SketchyPhysics.

This isn't exactly the most useful application for kitchen designers, but it certainly put a smile on my face after working on this design for hours and not really getting anywhere. It took me only a few minutes to setup this scene. First, you flag all the components as something you want to be able to take part in the "Physics" of your model. Next, I made an invisible ramp, and set the giant boulder on top of it. When I click start, the boulder rolls down the ramp, and smashes into the cabinets.

I have also used this plugin to simulate the workings of a hobby CNC machine that I built. If you open that model in Sketchup, and have SketchyPhysics installed, you can move the machine about on all three of its axes. I used this to check for clearance before I built the machine.

Now, to see some real examples of what SketchyPhysics can do, check out these videos:

So, if you ever need to take out some frustrations, simulate a robot, or an assembly line, this plugin can help you out!

Sketchup 8 Released!

Its an exciting day folks!  Fresh out of the Sketchup oven is a new version of Sketchup for all of us to play with!  There are some great additions and tweaks that make a great modeling software even better.  here are some of the headlines:

Geo Modeling update:

There are lots of new resources available to those who Geo Model.  You are now able to use aerial photography, StreetView and Google Earth images to build your geo located models.  Google has a massive database of imagery of the planet, and its now even easier to access it right within Sketchup.  You can now import Google Earth imagery into your model, in color, without the need to have Google Earth installed anymore!

This is the dialog where you can search any address on the planet and import its imagery in Sketchup

Color terrain data and imagery in Sketchup, and its in COLOR!  Pretty cool!  You didn't even need to leave Sketchup to get all of this.
The next feature that I think is really cool is the Igloo Modeling tool.  Before in Sketchup, you could model a photo using the Photomatch Feature.  Now, not only can you photomatch, but you can use multiple images, in any location that you want.  Basically, you can combine images from any angle to create an "Igloo" to model on:

Using different scenes, you can "enter" each image and start drawing on top of it.  If a particular image obscures the geometry that you need to draw, simply move to another scene.  All you have to do is zoom out, double click on the image, and then you are automatically taken "into" that image and you can start drawing on top of it.  I think this feature is going to be great not just for modeling buildings, but for modeling just about any object.  In the coming weeks, I am going to take some pictures of objects from multiple angles and model them.
There has been a nice update to the Styles window as well.  You now get thumbnail images of each of your scenes!  This is really helpful when you create models with lots of scenes.

There has also been another interesting update to the Styles tool.  You can enable something that is called "Back Edges"  Basically, it shows what would normally be hidden lines in your model.  This is a little trick that drafts people use to illustrate lines that are important, but wouldn't be seen in a particular view.  You could do this before in Sketchup by using a transparent color, but this option is much better because the hidden lines are dotted automatically.

There have been some improvements to LayOut as well.  We can now FINALLY do angular dimensions:

You can also export your LayOut documents to DWG and DXF, which is pretty cool because you can now send them to your AutoCAD using friends.  (And they now can all be a little jealous of your newly updated modeling tool)
If you look closely, you can see the dotted lines in the back of the "eight".
New Modeling tool:  Solids.
Sketchup is a "Face modeler".  In other words, everything that you model is made up if faces, and isn't "solid".  A lot of solid modelers have tools that allow you to intersect, union, and subtract from "solid" objects in the model.
In Sketchup 8, there are now "Solid" tools offered to help you model.  Think of it as a huge upgrade to the "Intersect with model" tool.  The intersect tool is a great tool, but sometimes it can be a little tricky to get it to do what you want it to do.  With these new tools, its really easy to make complex geometry.

There are a bunch of other improvements as well.  In the coming weeks, I will be covering these.  In the mean time, I will be at Basecamp learning from the Sketchup creators all there is to know about these exciting new tools and features!

Basecamp 2010

This is a boulder that doesn't get capitalized.
This Boulder gets capitalized.

It's where I am heading to on Tuesday for the tenth anniversary of Google Sketchup.  Every so often, the folks over at Google invite users from Sketchup from all over the world out to the Sketchup factory in Boulder for what Google calls an "unconference".
Two hundred Sketchup users were invited.  Myself, and another fellow Sketchup user will be hailing form western Massachusetts, some folks are local to Boulder, and some are coming from around the world!  I have been in contact with a fellow Sketchup user form Australia!  We "met" online due to our mutual interest in our favorite 3D modeling software, and now are going to meet for the first time. He's not the only one coming from overseas.
It's events, and people like this that make me really appreciate what I had to go through in high school as a bit of a geek. Now I get to hang with people from all over the world, at one of the biggest tech phenomenons of our time.

Yes, that is the main lobby of the Google Boulder office.  Yes, you do see a rock climbing wall in the background!
I'll be keeping my Facebook page and my Twitter feed as up to date as possible while I am out there (and while sitting idle at the airport as well).  Stay tuned for more details!

Sinks of Steel

As I am sure you know, I use Sketchup daily for kitchen design.  One of the things that comes up all the time when using Sketchup is undermounting a sink.  It used to be a tedious process of cutting a hole in the countertop that was the right shape for the sink, and then dropping the sink into the hole.  If you were able to get it right the first time, it still took you forever.  If you have to move the sink, forget about it, you'd probably give up.

That is why a while back, I created these undermount sinks.

Those sinks have been working great for a long time.  They've gotten tons of downloads, and have been used in just about every kitchen and bathroom I have designed for the last year or so.

I was recently inspired by these faucets that are now available on the 3D warehouse from Delta and Brizo.  Not only are they extremely useful, but the folks who created the models over at Igloo Studios did a really neat trick with using a single photo texture to make the faucets appear to be real, without having to be rendered.  I did a post on this a few months ago where I compared these faucets to Miami Vice.  See how Don Johnson faired by clicking here.

I sell a line of stainless steel sinks by Artisan.  They are quite popular, and end up in a lot of our kitchen designs.  A few of the other designers I work with were asking me if I could build an offset double bowl sink in Sketchup, and a "D" bowl.  Instead of creating a generic one, I decided to create one that we sell.  In the next few pictures, you will see the process I used to build these sinks.  If you are impatient, and just want the goods, get into Sketchup and search for "Artisan Sinks" on the 3D warehouse.

There are a few things I need to model a sink in Sketchup accurately.  First, I need the dimensions.  I headed over to Artisan's website and grabbed a technical drawing on one of their sinks.

I imported the drawing into Sketchup.  There I was able to scale the image based on the dimensions that are on the drawing.  From there, I started to trace right over the image to start getting the shape of the sink.

Next, I used Sketchup's famous Push Pull tool to start massing up the sink.

I removed some unnecessary geometry, now you can see that the sink is starting to take shape.
 
Now I have hidden edges that I don't want to be seen.  Notice that I left the edges along the top, and bottom.  In the next picture you will see that I can select those edges, and use a plugin to round them over.
Using this plugin I was able to select the edges that I wanted to round over.  Much easier then using Sketchup's built in "Follow Me" tool.
So there it is, a model that is all ready for some textures.

I grabbed a picture of the sink from the same website.  I placed the picture directly over the model that I wanted to paint it onto.  You can "project" textures onto models.  Think of it like standing in front of a projector, the image is "projected" onto you.  Using this method, you can paint flat textures onto 3D models.

Since my model was drawn accurately, and the picture I was using was distorted (as most images are, because camera lenses bend images) I had to use Sketchup's built in texture positioning tools to fine tune the texture.  If you've got a texture that is really out of shape, you can fix it up with a little Photoshop trickery.  These texture tools were designed for texturing buildings, but they can work rather well for this sort of modeling.

There is the final product.  Its a accurately sized, textured kitchen sink.  It doesn't end there though.  Next I made a Dynamic Component out of this sink.

This will help you, the end user with a couple of things.  First, the component will automatically cut a hole for you in your countertop.  It also has an option to set how deep its undermounted.  And lastly, in the component, there are links to the specs of the sink, and a video on how exactly to use it!  To get to all of these, simply right click on the sink when you have it in Sketchup, go to Dynamic Components, and then to "Options" and you will see the settings and the link.
So, go into Sketchup and search for Artisan Sinks.  I've got a collection of three different ones in there to help you model!
http://sketchup.google.com/3dwarehouse/cldetails?mid=b31bc56becdd90e784283d54542a3ba0

Designing with Corian in Sketchup

Have you ever had that friend that broke up with their significant other, and started another relationship weeks, or even days after it ended?  That can be a tough transision, one that rarely ever works.  Usually the reasons for starting the new relationship aren't thought through, and it almost always end up not working out in the end...

When I teach people Sketchup, I tell them that they don't have to give up their current solution, no matter how bad it is!  Throwing away your current solution and jumping into another without learning it first can be a disaster, no matter how great the new system is.  A smooth transition is the way to go.

A great way to get started in Sketchup, without switching overnight is to draw small parts of your project in it.  I started in Sketchup using it for countertop quotes.  Countertop quotes are really easy to draw, and easy to understand.  Even if you start a Sketchup countertop and give up, one can draw a countertop quote in pencil in a matter of minutes.  The risk is very low to try it out, and the reward is some great Sketchup training.

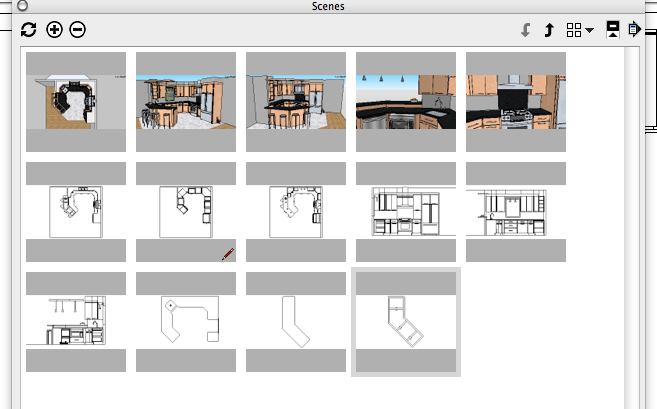
A typical countertop quote for me looks like this:

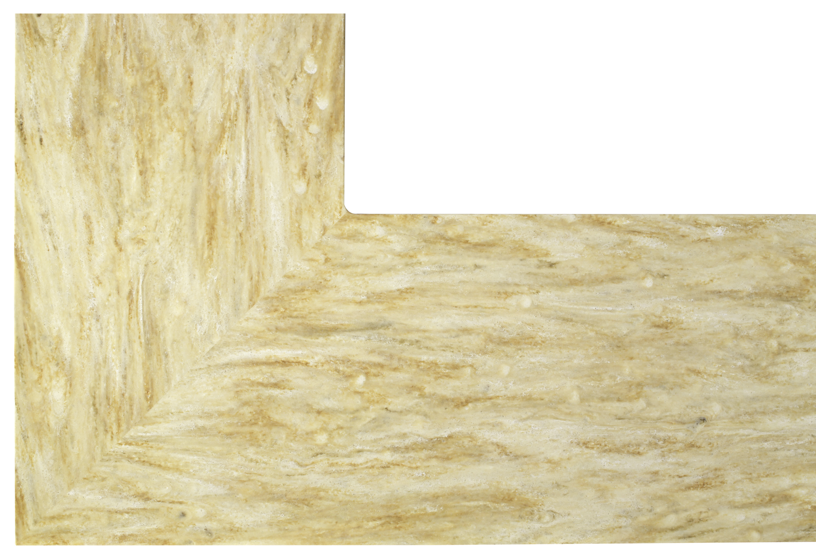
With the introduction of the Corian Private collection, I had a customer that didn't understand the grain direction in Corian, and what that would look like.  If you aren't familiar with the Corian Private collection, take a look at this picture:

The "grain" on the Corian Private collection series typically runs in one direction.  This poses a problem when you get to joints, as that grain will have to change direction.  In this case, it's mitered.

In a typical "U" shaped kitchen, you could have two joints.  What do you do, do you mitre?  Do you do butt joints?  More to the point, even if you understand what this will look like, will your customer?

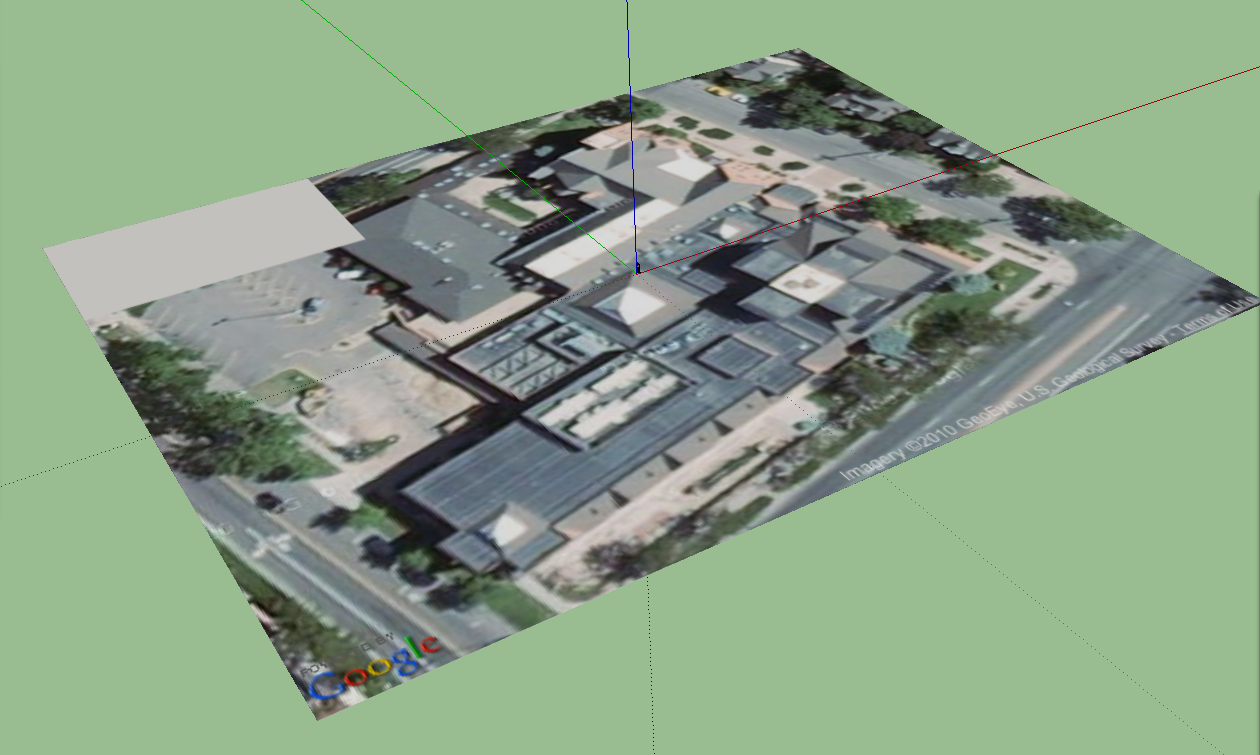
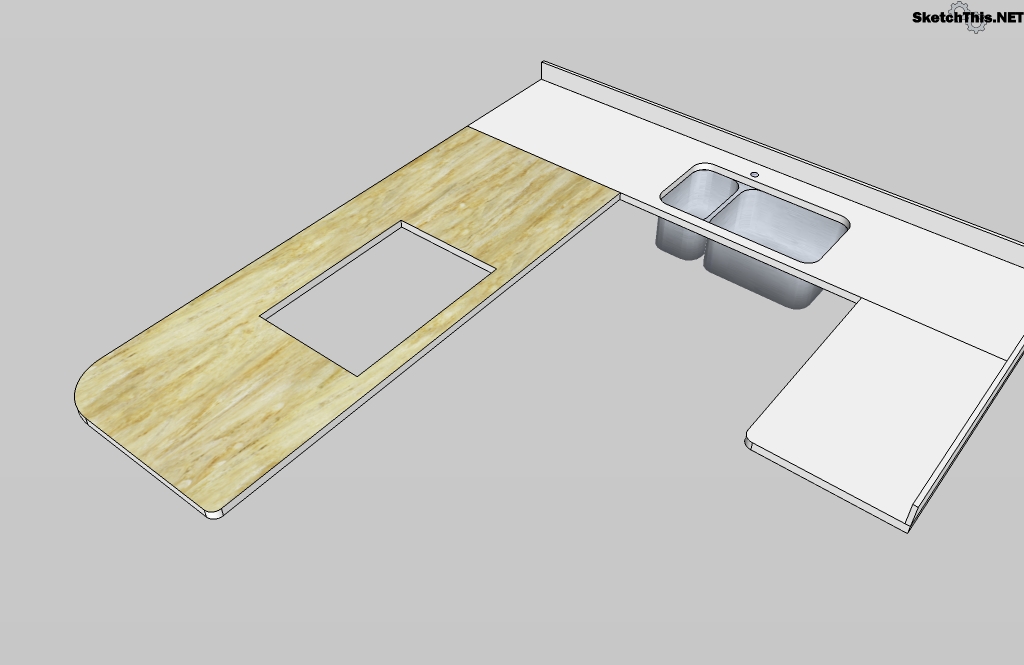
Enter my solution.  The picture below is a Sketchup model.  It was drawn to accurate dimensions, and the texture is an actual picture of a Corian Saffron slab.  I was able to draw the countertop, draw in the seams, place and rotate the textures, all in minutes.

To do this, first start by drawing your countertop in Sketchup.  You can draw in a backsplash, and you should also draw lines separating the deck where you would like the seam.  This separates the faces of your countertop so that you can put a texture on each face, and rotate it to you liking.  My drawing started out looking like this:

Notice I plan on doing two butt joints.  So I drew lines across the deck where those seams are going to be.  The next step is to apply your textures.  You can create Corian Private Collection texture like I did, or you can download this model at the end of the post and experiment with the texture that is already in the model.  Place the texture on the first leg of your countertop, like this:

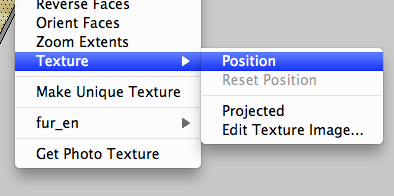
Now, I want this "grain" to be running the long way.  Its really easy to do, just right click on the face with the texture, and select "Texture" and then select "Position"

Now, this will put the texture into a mode that will allow you to scale it, twist it, and distort it.  You can do this by grabbing and pulling the pins that are around the texture.  YOU DON'T WANT TO DO THIS!  Using those pins is a great method for distorting textures, and getting them to fit on faces, but in this case, we want to maintain the scale of the texture.  I went to a lot of trouble photographing that texture so that it would be the right scale in the drawing, there is no need to ruin all that hard work!

So, if you right click again, and select "Rotate" and then "90" the texture will be rotated 90 degrees.  The scale won't be affected at all, and you didn't have to drag any of those pins around.  If you see the edge of a texture, you can just click and drag the texture around to place it where you want it on the face.  These textures are drawn the exact size of Corian slabs, so this can help you determine if you need another seam if you have a really long counter. (Always check with your favorite fabricator too!)

Right click again, and select "Done".  Now your "grain" should be running in this direction:

 Now, repeat this process for the other two faces.  Rotate as needed.

 Now, lastly you have those black lines across your seams, which I don't like personally.  Its really easy to get rid of them.  You can either right click on each line and select "Hide" or, you can use the Erase tool while holding shift.  When using the Erase tool WHILE holding shift, any lines that you go over this way will be hidden.  If you use the erase tool without holding shift, you will actually remove the line and the two adjacent faces will be connected, and your textures won't be rotated the right way.

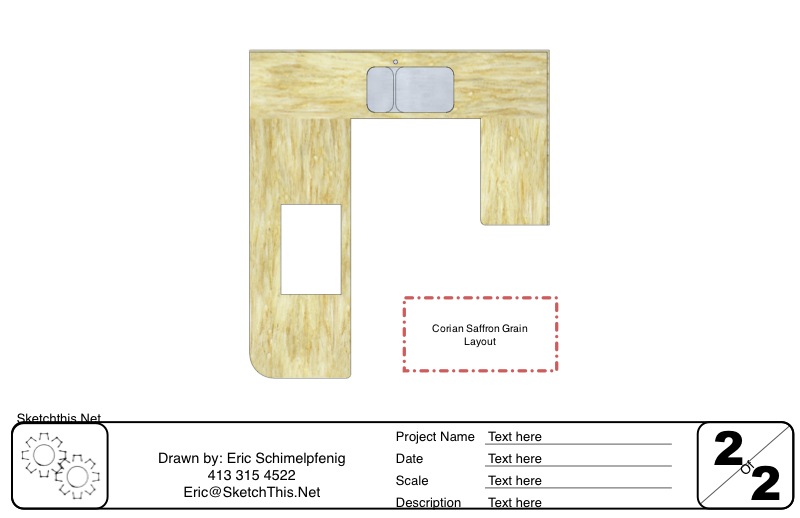
So, while this may seem time consuming, its really not.  I can now create a drawing just like this in about 15 minutes or less.  Its a great way to show how Corian, and granite seams are going to look, and makes a really professional document for both your customer, and your fabricators. The dimensioned schematic that you see here was created in LayOut, which I will cover in a future post.

Search for "Corian Saffron" countertop in Sketchup's 3D warehouse, or download the model with the link below.

These instructions are a brief overview of how this process is done.  If you have any specific questions, please feel free to post in the comments below, or contact us directly.