Have you ever had that friend that broke up with their significant other, and started another relationship weeks, or even days after it ended? That can be a tough transision, one that rarely ever works. Usually the reasons for starting the new relationship aren't thought through, and it almost always end up not working out in the end...
When I teach people Sketchup, I tell them that they don't have to give up their current solution, no matter how bad it is! Throwing away your current solution and jumping into another without learning it first can be a disaster, no matter how great the new system is. A smooth transition is the way to go.
A great way to get started in Sketchup, without switching overnight is to draw small parts of your project in it. I started in Sketchup using it for countertop quotes. Countertop quotes are really easy to draw, and easy to understand. Even if you start a Sketchup countertop and give up, one can draw a countertop quote in pencil in a matter of minutes. The risk is very low to try it out, and the reward is some great Sketchup training.
A typical countertop quote for me looks like this:
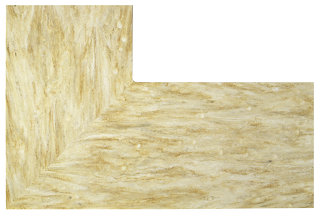
With the introduction of the Corian Private collection, I had a customer that didn't understand the grain direction in Corian, and what that would look like. If you aren't familiar with the Corian Private collection, take a look at this picture:
The "grain" on the Corian Private collection series typically runs in one direction. This poses a problem when you get to joints, as that grain will have to change direction. In this case, it's mitered.
In a typical "U" shaped kitchen, you could have two joints. What do you do, do you mitre? Do you do butt joints? More to the point, even if you understand what this will look like, will your customer?
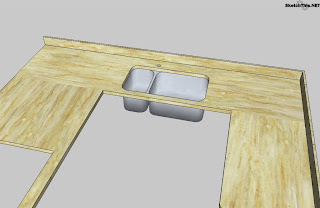
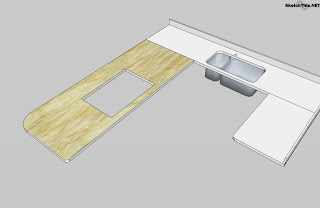
Enter my solution. The picture below is a Sketchup model. It was drawn to accurate dimensions, and the texture is an actual picture of a Corian Saffron slab. I was able to draw the countertop, draw in the seams, place and rotate the textures, all in minutes.
To do this, first start by drawing your countertop in Sketchup. You can draw in a backsplash, and you should also draw lines separating the deck where you would like the seam. This separates the faces of your countertop so that you can put a texture on each face, and rotate it to you liking. My drawing started out looking like this:
Notice I plan on doing two butt joints. So I drew lines across the deck where those seams are going to be. The next step is to apply your textures. You can create Corian Private Collection texture like I did, or you can download this model at the end of the post and experiment with the texture that is already in the model. Place the texture on the first leg of your countertop, like this:
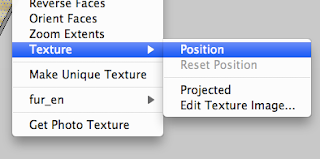
Now, I want this "grain" to be running the long way. Its really easy to do, just right click on the face with the texture, and select "Texture" and then select "Position"
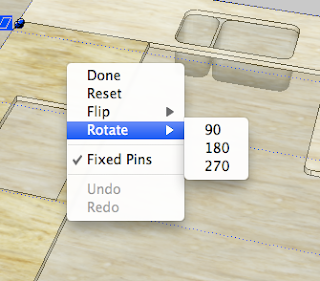
Now, this will put the texture into a mode that will allow you to scale it, twist it, and distort it. You can do this by grabbing and pulling the pins that are around the texture. YOU DON'T WANT TO DO THIS! Using those pins is a great method for distorting textures, and getting them to fit on faces, but in this case, we want to maintain the scale of the texture. I went to a lot of trouble photographing that texture so that it would be the right scale in the drawing, there is no need to ruin all that hard work!
So, if you right click again, and select "Rotate" and then "90" the texture will be rotated 90 degrees. The scale won't be affected at all, and you didn't have to drag any of those pins around. If you see the edge of a texture, you can just click and drag the texture around to place it where you want it on the face. These textures are drawn the exact size of Corian slabs, so this can help you determine if you need another seam if you have a really long counter. (Always check with your favorite fabricator too!)
Right click again, and select "Done". Now your "grain" should be running in this direction:
Now, repeat this process for the other two faces. Rotate as needed.
Now, lastly you have those black lines across your seams, which I don't like personally. Its really easy to get rid of them. You can either right click on each line and select "Hide" or, you can use the Erase tool while holding shift. When using the Erase tool WHILE holding shift, any lines that you go over this way will be hidden. If you use the erase tool without holding shift, you will actually remove the line and the two adjacent faces will be connected, and your textures won't be rotated the right way.
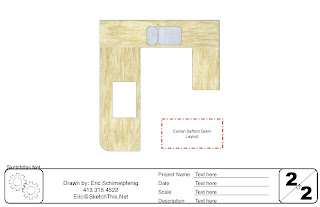
So, while this may seem time consuming, its really not. I can now create a drawing just like this in about 15 minutes or less. Its a great way to show how Corian, and granite seams are going to look, and makes a really professional document for both your customer, and your fabricators. The dimensioned schematic that you see here was created in LayOut, which I will cover in a future post.
Search for "Corian Saffron" countertop in Sketchup's 3D warehouse, or download the model with the link below.
These instructions are a brief overview of how this process is done. If you have any specific questions, please feel free to post in the comments below, or contact us directly.


